# Zookeeper 的使用和配置中心实现
作者:小傅哥
博客:https://bugstack.cn (opens new window)
沉淀、分享、成长,让自己和他人都能有所收获!😄
本文的宗旨在于通过简单干净实践的方式,向读者介绍 Zookeeper 的安装配置,学习 SpringBoot 整合使用,以及基于 Zookeeper 开发一个简单的配置中心功能内核。通过这样的实践方式,让读者入门和掌握 Zookeeper 以应对后续需要此技术栈的相关开发项目。
本文的重点是基于 Zookeeper 实现的配置中心,那配置中心是啥呢?🤔
配置中心在大厂系统开发中是一个非常常用的功能,它的核心功能在于不需要上线系统的情况下,改变系统中对象或者属性的值。是属性的值,也就是你在通过类获取某个属性,判断;功能开关、渠道地址、人群名单、息费费率、切量占比等等,这些可能随时动态调整的值,都是通过配置中心实现的。所以在本章节的案例中,小傅哥基于 Zookeeper 组件的功能特性,来设计这样一个配置中心,方便大家学习。
本文涉及的工程:
- xfg-dev-tech-zookeeper:https://gitcode.net/KnowledgePlanet/road-map/xfg-dev-tech-zookeeper (opens new window) -
docs/dev-ops 提供了 Zookeeper 安装脚本
# 一、配置中心
Zookeeper 有什么特性,动态配置中心怎么做?
技术是支撑解决方案实现的,有了各个技术栈组件的自身特点,才好实现出我们所需的各类功能。那么这样的一个能让,各个服务都可以动态变更配置的配置中心,就要用到 Zookeeper 的节点监听和节点值的变化来动态设置 Java 类中属性的变化。如图
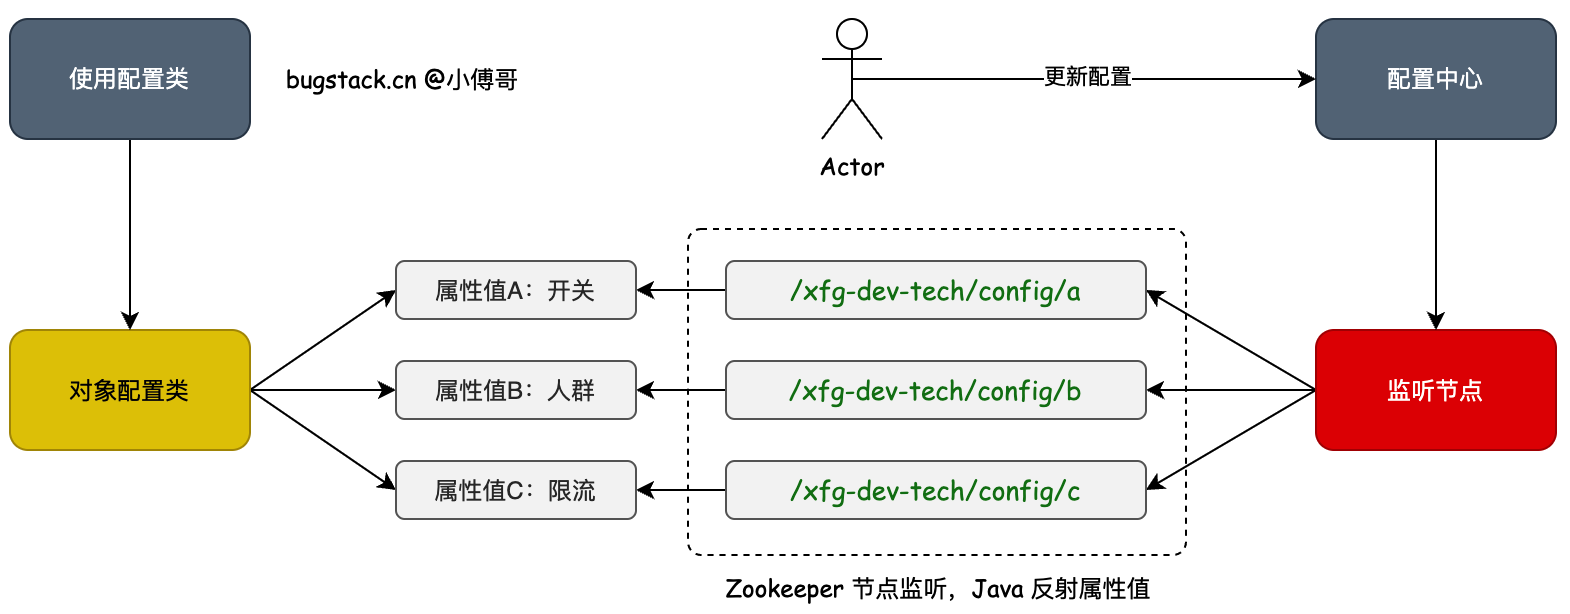
- 首先,我们需要定义出一个 Zookeeper 监听的配置路径,一般这个路径在配置中心中是申请的系统使用地址,以确保值的唯一。
- 之后,每个类对应的属性,需要映射出一个监听的节点。比如;Zookeeper 监听了
/xfg-dev-tech/config那么类中 a 属性可以是/xfg-dev-tech/config/a这对这个路径设置的值,就可以被监听拿到了。 - 最后,把获取到的监听值,通过 Java 反射操作,把值设置到对应的属性上。这样在 SpringBoot 应用程序中,使用某个类的属性值的时候,就可以动态的获取到变化的属性值了。
# 二、环境配置
在安装执行 docker-compose.yml 脚本之前,你需要先在本地安装 docker (opens new window) 之后 IntelliJ IDEA 打开 docker-compose.yml 文件,如图操作即可安装。
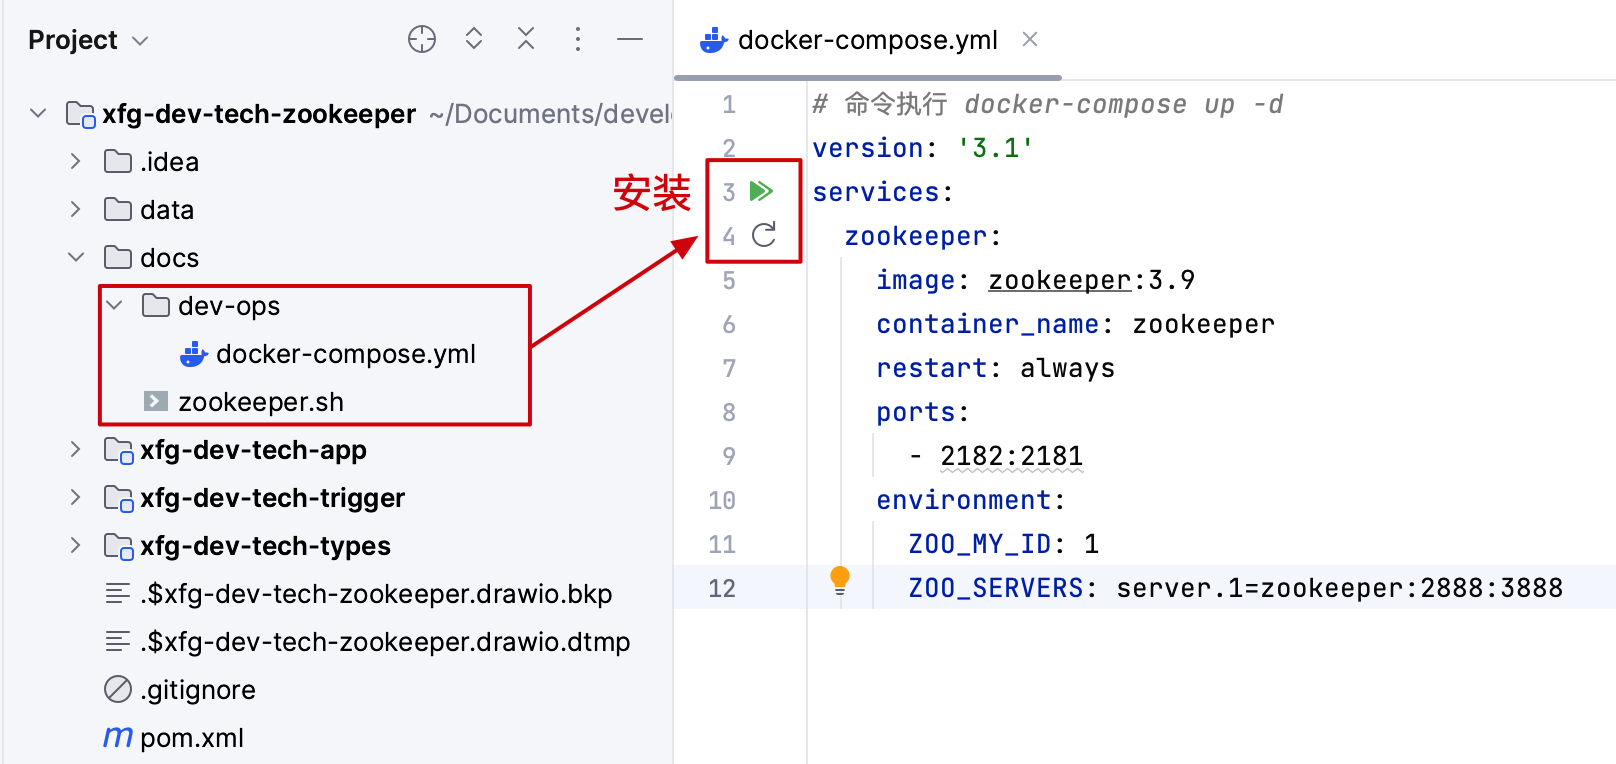

- 另外,如果你是在服务器上安装,则需要执行
docker-compose -f docker-compose.yml up -d并且是你已经安装了 Docker-Compose 包。—— 这些内容在小傅哥的《Java 简明教程》 (opens new window)中都有讲解,可以进入学习。
# 三、基本使用
连接脚本:
docker exec -it zookeeper bash
zkCli.sh -server IP(替换为你自己的):2181
2
常用命令:
1. 创建节点:create /path data
2. 创建临时节点:create -e /path data
3. 创建顺序节点:create -s /path data
4. 创建临时顺序节点:create -e -s /path data
5. 获取节点数据:get /path
6. 获取节点子节点列表:ls /path
7. 更新节点数据:set /path data
8. 删除节点:delete /path
9. 删除节点及其子节点:deleteall /path
10. 监听节点变化:get -w /path
11. 查看节点状态:stat /path
12. 查看节点ACL权限:getAcl /path
13. 设置节点ACL权限:setAcl /path acl
14. 查看节点子节点数量:count /path
15. 查看节点子节点数量并监听变化:count -w /path
2
3
4
5
6
7
8
9
10
11
12
13
14
15
root@4365b68d50d6:/apache-zookeeper-3.9.0-bin# ls
bin  conf  docs  lib  LICENSE.txt  NOTICE.txt  README.md  README_packaging.md
root@4365b68d50d6:/apache-zookeeper-3.9.0-bin# zkCli.sh -server 10.253.6.71:2181

[zk: 192.168.1.101:2181(CONNECTED) 1] ls /xfg-dev-tech
[config, configdowngradeSwitch]
[zk: 192.168.1.101:2181(CONNECTED) 2]
2
3
4
5
6
7
执行完链接 Zookeeper 以后,就可以执行这些常用命令了。你也可以尝试着练习下这些命令。
# 四、功能实现
# 1. 工程结构
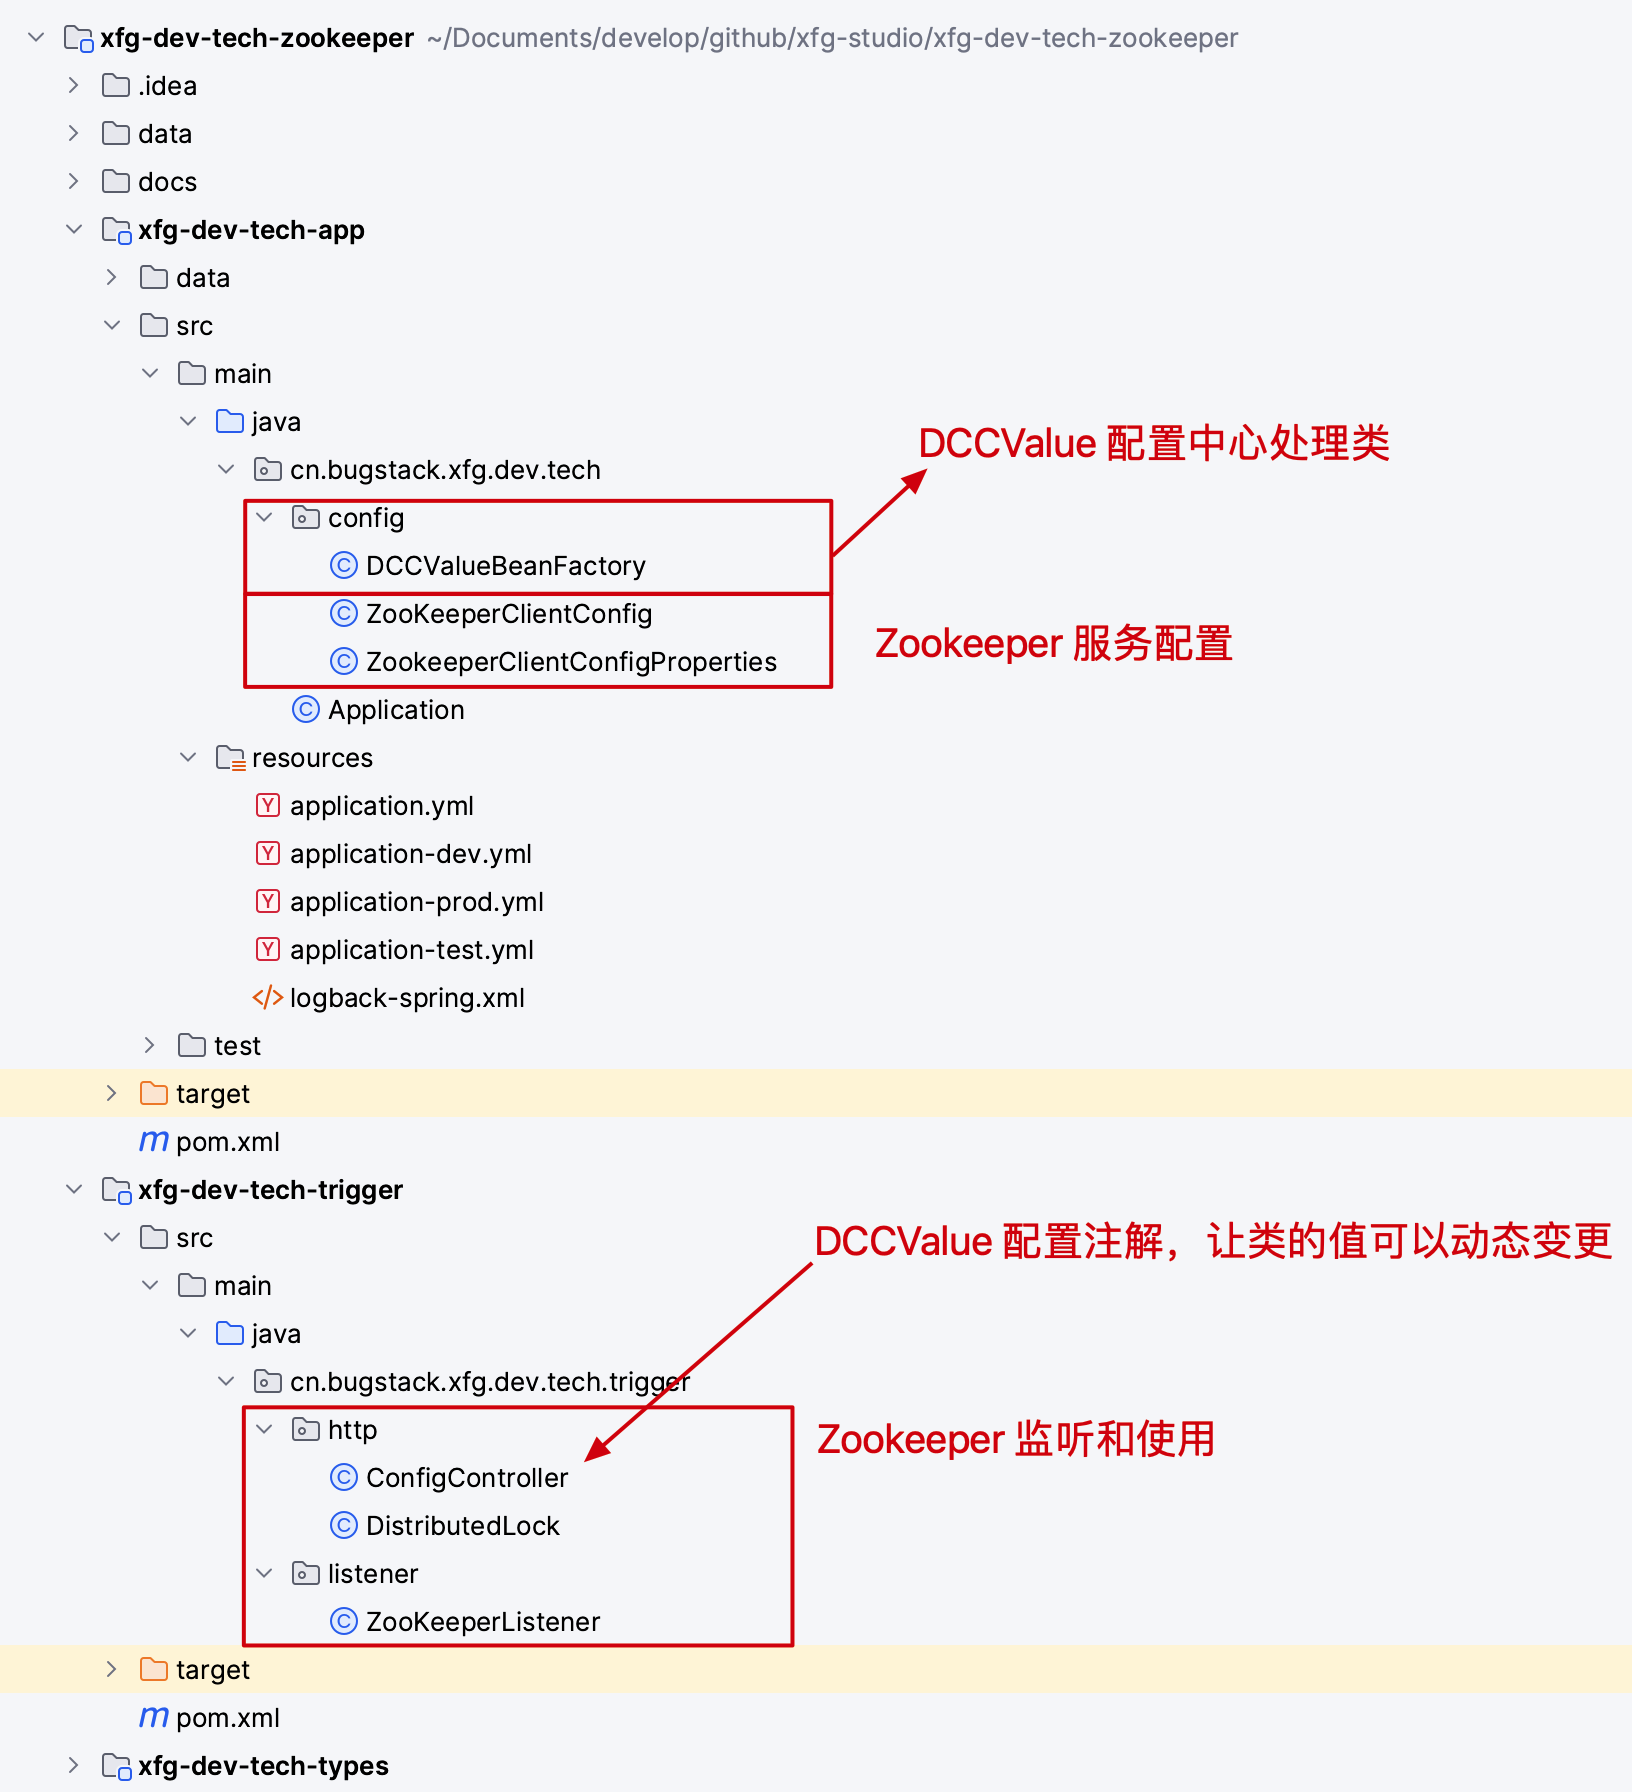
工程结构分为2个部分:
- app 启动层的 config 包下,用于提供 Zookeeper 服务的启动配置。以及小傅哥在这里新添加的功能 DCCValue 配置中心模块。
- trigger 是触发器,这里吧 http 请求、listener 监听,都是放到这里使用。另外像 MQ、JOB、RPC 也是放到这一层,以这一层触发,来调用我们的领域服务。
# 2. 启动 Zookeeper 服务
# 2.1 自定配置
@Data
@ConfigurationProperties(prefix = "zookeeper.sdk.config", ignoreInvalidFields = true)
public class ZookeeperClientConfigProperties {

    private String connectString;
    private int baseSleepTimeMs;
    private int maxRetries;
    private int sessionTimeoutMs;
    private int connectionTimeoutMs;

}
2
3
4
5
6
7
8
9
10
11
# 2.2 使用配置
zookeeper:
  sdk:
    config:
      connect-string: 10.253.6.71:2181
      base-sleep-time-ms: 1000
      max-retries: 3
      session-timeout-ms: 1800000
      connection-timeout-ms: 30000
2
3
4
5
6
7
8
# 2.3 配置服务
@Configuration
@EnableConfigurationProperties(ZookeeperClientConfigProperties.class)
public class ZooKeeperClientConfig {

    /**
     * 多参数构建ZooKeeper客户端连接
     *
     * @return client
     */
    @Bean(name = "zookeeperClient")
    public CuratorFramework createWithOptions(ZookeeperClientConfigProperties properties) {
        ExponentialBackoffRetry backoffRetry = new ExponentialBackoffRetry(properties.getBaseSleepTimeMs(), properties.getMaxRetries());
        CuratorFramework client = CuratorFrameworkFactory.builder()
                .connectString(properties.getConnectString())
                .retryPolicy(backoffRetry)
                .sessionTimeoutMs(properties.getSessionTimeoutMs())
                .connectionTimeoutMs(properties.getConnectionTimeoutMs())
                .build();
        client.start();
        return client;
    }

}
2
3
4
5
6
7
8
9
10
11
12
13
14
15
16
17
18
19
20
21
22
23
- 这样我们就可以启动一个 Zookeeper 的客户端了,自定义可以更好的控制和使用。
# 3. 定义注解
就功能来讲,我们需要对类中的属性进行赋值操作。那么就需要使用自定义注解进行标记。所以这里我们先自定义一个注解。
@Retention(RetentionPolicy.RUNTIME)
@Target({ElementType.FIELD})
@Documented
public @interface DCCValue {

    String value() default "";

}
2
3
4
5
6
7
8
- 这样所有使用了
@DCCValue的注解的字段就都可以被我扫描到了。
# 4. 监听变化
# 4.1 获取属性
源码:cn.bugstack.xfg.dev.tech.config.DCCValueBeanFactory#postProcessAfterInitialization
@Override
public Object postProcessAfterInitialization(Object bean, String beanName) throws BeansException {
    Class<?> beanClass = bean.getClass();
    Field[] fields = beanClass.getDeclaredFields();
    for (Field field : fields) {
        if (field.isAnnotationPresent(DCCValue.class)) {
            DCCValue dccValue = field.getAnnotation(DCCValue.class);
            try {
                if (null == client.checkExists().forPath(BASE_CONFIG_PATH.concat("/").concat(dccValue.value()))) {
                    client.create().creatingParentsIfNeeded().forPath(BASE_CONFIG_PATH.concat("/").concat(dccValue.value()));
                    log.info("DCC 节点监听 listener node {} not absent create new done!", BASE_CONFIG_PATH.concat("/").concat(dccValue.value()));
                }
            } catch (Exception e) {
                throw new RuntimeException(e);
            }
            dccObjGroup.put(BASE_CONFIG_PATH.concat("/").concat(dccValue.value()), bean);
        }
    }
    return bean;
}
2
3
4
5
6
7
8
9
10
11
12
13
14
15
16
17
18
19
20
- DCCValueBeanFactory 实现了 BeanPostProcessor 接口的 postProcessAfterInitialization 方法。
- 在实现中,通过对 bean 对象的解析获取到使用 DCCValue 注解属性,并判断这个属性拼接的地址是否在 Zookeeper 中创建,如果没有则创建。之后保存对象到内存中。
# 4.2 设置属性
源码:cn.bugstack.xfg.dev.tech.config.DCCValueBeanFactory#DCCValueBeanFactory
curatorCache.listenable().addListener((type, oldData, data) -> {
    switch (type) {
        case NODE_CHANGED:
            String dccValuePath = data.getPath();
            Object objBean = dccObjGroup.get(dccValuePath);
            try {
                // 1. getDeclaredField 方法用于获取指定类中声明的所有字段,包括私有字段、受保护字段和公共字段。
                // 2. getField 方法用于获取指定类中的公共字段,即只能获取到公共访问修饰符(public)的字段。
                Field field = objBean.getClass().getDeclaredField(dccValuePath.substring(dccValuePath.lastIndexOf("/") + 1));
                field.setAccessible(true);
                field.set(objBean, new String(data.getData()));
                field.setAccessible(false);
            } catch (Exception e) {
                throw new RuntimeException(e);
            }
            break;
        default:
            break;
    }
});
2
3
4
5
6
7
8
9
10
11
12
13
14
15
16
17
18
19
20
- 基于 Zookeeper 对节点的监听,只要这个节点上有值发生变化。就可以立刻检测到对应的路径信息和值信息。
- 那么拿到这个值信息,就可以把值写入到对应的属性上了。如
类.A = Zookeeper 获取到的值
# 五、功能使用
源码:cn.bugstack.xfg.dev.tech.trigger.http.ConfigController
@RestController
public class ConfigController {

    @DCCValue("downgradeSwitch")
    private String downgradeSwitch;

    @DCCValue("userWhiteList")
    private String userWhiteList;

    @Resource
    private CuratorFramework curatorFramework;

    /**
     * curl http://localhost:8091/getConfig/downgradeSwitch
     */
    @RequestMapping("/getConfig/downgradeSwitch")
    public String getConfigDowngradeSwitch() {
        return downgradeSwitch;
    }

    /**
     * curl http://localhost:8091/getConfig/userWhiteList
     */
    @RequestMapping("/getConfig/userWhiteList")
    public String getConfigUserWhiteList() {
        return userWhiteList;
    }

    /**
     * curl -X GET "http://localhost:8091/setConfig?downgradeSwitch=false&userWhiteList=xfg,user2,user3"
     */
    @GetMapping("/setConfig")
    public void setConfig(Boolean downgradeSwitch, String userWhiteList) throws Exception {
        curatorFramework.setData().forPath("/xfg-dev-tech/config/downgradeSwitch", (downgradeSwitch ? "开" : "关").getBytes(StandardCharsets.UTF_8));
        curatorFramework.setData().forPath("/xfg-dev-tech/config/userWhiteList", userWhiteList.getBytes(StandardCharsets.UTF_8));
    }

}
2
3
4
5
6
7
8
9
10
11
12
13
14
15
16
17
18
19
20
21
22
23
24
25
26
27
28
29
30
31
32
33
34
35
36
37
38
这里的核心验证就是让 downgradeSwitch、userWhiteList 这2个属性值可以动态变化;
- 在两个属性上添加注解后,就会被扫描和管理。
- 获取值方法:http://localhost:8091/getConfig/downgradeSwitch (opens new window)、http://localhost:8091/getConfig/userWhiteList (opens new window)
- 设置值方法:http://localhost:8091/setConfig?downgradeSwitch=false&userWhiteList=xfg,user2,user3 (opens new window) -
这里的设置值操作不非得在这里,可以是一个单独的控制后台来操作。这里的方式主要是演示作用
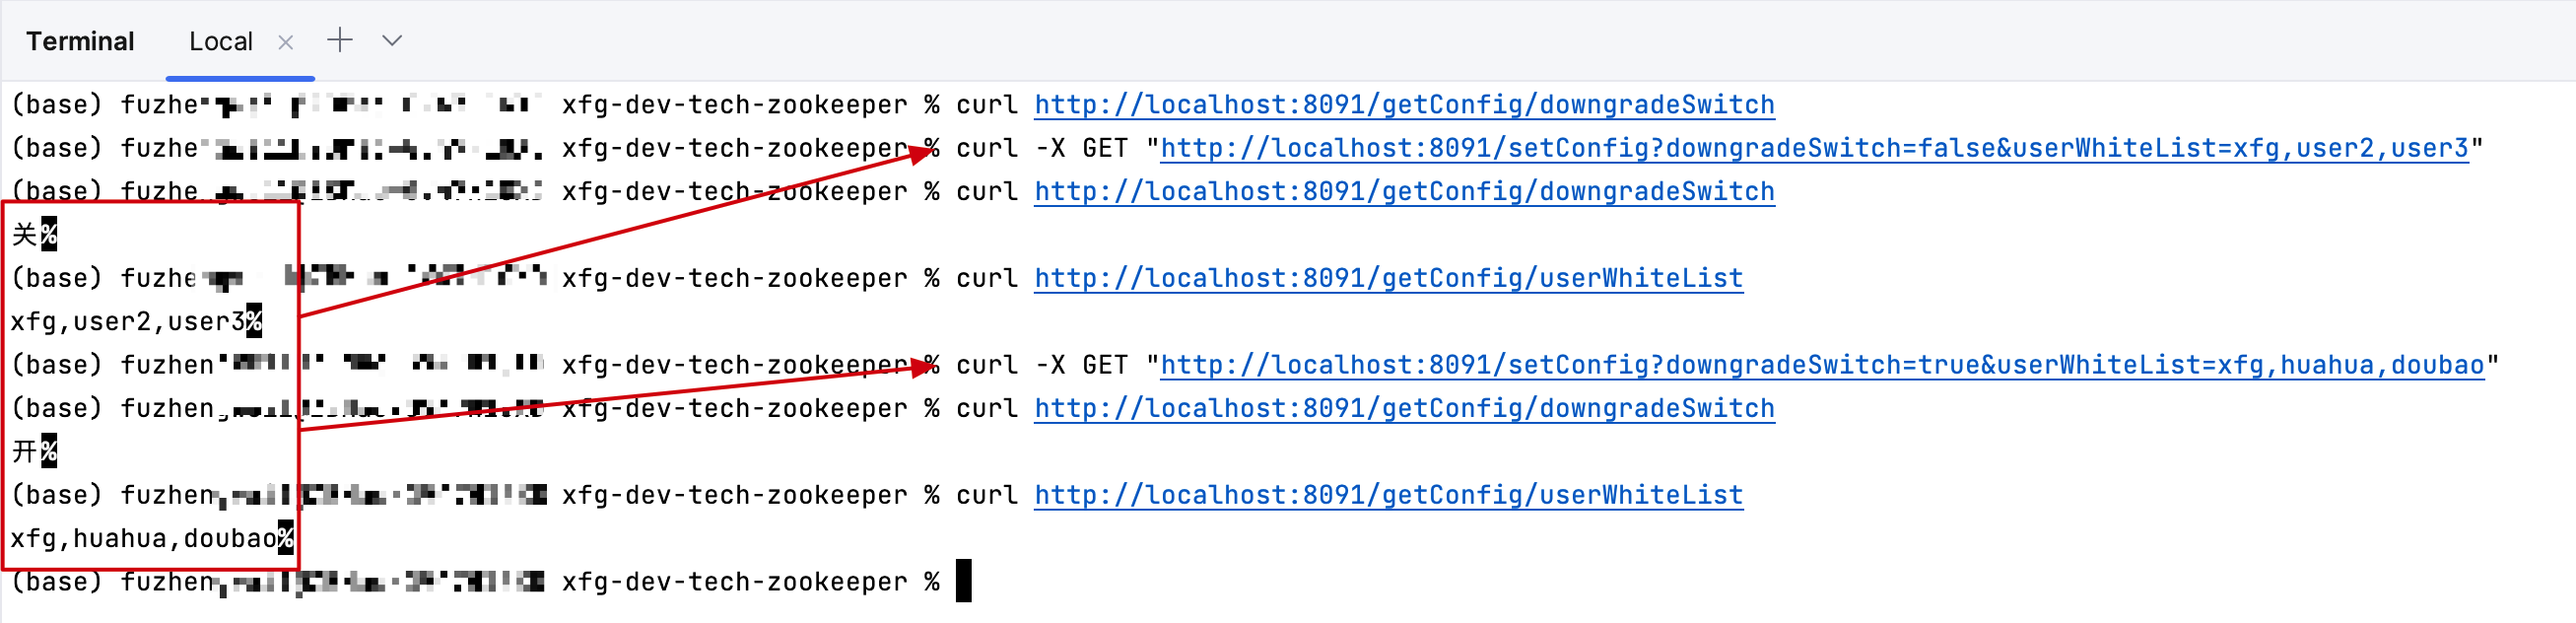
你可以按照如图的操作顺序,进行验证属性值的变化。
# 六、其他测试
@Slf4j
@RunWith(SpringRunner.class)
@SpringBootTest
public class ApiTest {

    @Resource
    private CuratorFramework curatorFramework;

    @Test
    public void test_all() throws Exception {
        String path = "/xfg-dev-tech/config/downgradeSwitch";
        String data = "0";
        curatorFramework.create().withMode(CreateMode.EPHEMERAL).forPath(path, data.getBytes(StandardCharsets.UTF_8));

        for (int i = 0; i < 2; i++) {
            curatorFramework.setData().forPath(path, String.valueOf(i).getBytes(StandardCharsets.UTF_8));
        }
    }

    /**
     * 创建永久节点
     */
    @Test
    public void createNode() throws Exception {
        String path = "/xfg-dev-tech/config/downgradeSwitch/test/a";
        String data = "0";
        if (null == curatorFramework.checkExists().forPath(path)) {
            curatorFramework.create().creatingParentsIfNeeded().forPath(path);
        }
    }

    /**
     * 创建临时节点
     */
    @Test
    public void createEphemeralNode() throws Exception {
        String path = "/xfg-dev-tech/config/epnode";
        String data = "0";
        curatorFramework.create().withMode(CreateMode.EPHEMERAL).forPath(path, data.getBytes(StandardCharsets.UTF_8));
    }

    /**
     * 创建临时有序节点
     */
    @Test
    public void crateEphemeralSequentialNode() throws Exception {
        String path = "/xfg-dev-tech/config/epsnode";
        String data = "0";
        curatorFramework.create()
                .withMode(CreateMode.EPHEMERAL_SEQUENTIAL)
                .forPath(path, data.getBytes(StandardCharsets.UTF_8));
    }

    /**
     * 往节点种设置数据
     */
    @Test
    public void setData() throws Exception {
        curatorFramework.setData().forPath("/xfg-dev-tech/config/downgradeSwitch", "111".getBytes(StandardCharsets.UTF_8));
        curatorFramework.setData().forPath("/xfg-dev-tech/config/userWhiteList", "222".getBytes(StandardCharsets.UTF_8));
    }

    @Test
    public void getData() throws Exception {
        String downgradeSwitch = new String(curatorFramework.getData().forPath("/xfg-dev-tech/config/downgradeSwitch"), StandardCharsets.UTF_8);
        log.info("测试结果: {}", downgradeSwitch);
        String userWhiteList = new String(curatorFramework.getData().forPath("/xfg-dev-tech/config/userWhiteList"), StandardCharsets.UTF_8);
        log.info("测试结果: {}", userWhiteList);
    }

    /**
     * 异步修改数据
     */
    @Test
    public void setDataAsync() throws Exception {
        String path = "/xfg-dev-tech/config/downgradeSwitch";
        String data = "0";
        CuratorListener listener = (client, event) -> {
            Stat stat = event.getStat();
            log.info("stat=" + JSON.toJSONString(stat));
            CuratorEventType eventType = event.getType();
            log.info("eventType=" + eventType.name());
        };
        curatorFramework.getCuratorListenable().addListener(listener);
        curatorFramework.setData().inBackground().forPath(path, data.getBytes(StandardCharsets.UTF_8));
    }


    /**
     * 删除节点
     */
    @Test
    public void deleteData() throws Exception {
        String path = "/xfg-dev-tech/config/downgradeSwitch";
        curatorFramework.delete().deletingChildrenIfNeeded().forPath(path);
    }

    /**
     * 安全删除节点
     */
    @Test
    public void guaranteedDeleteData() throws Exception {
        String path = "/xfg-dev-tech/config/downgradeSwitch";
        curatorFramework.delete().guaranteed().forPath(path);
    }

    /**
     * 获取子节点下的全部子节点路径集合
     */
    @Test
    public void watchedGetChildren() throws Exception {
        String path = "/xfg-dev-tech";
        List<String> children = curatorFramework.getChildren().watched().forPath(path);
        log.info("测试结果:{}", JSON.toJSONString(children));
    }


    /**
     * 获取节点数据
     */
    @Test
    public void getDataByPath() throws Exception {
        String path = "/xfg-dev-tech/config/downgradeSwitch";
        String fullClassName = "";
        String jsonStr = new String(curatorFramework.getData().forPath(path), StandardCharsets.UTF_8);
        Class clazz = Class.forName(fullClassName);
        log.info("测试结果:{}", JSON.parseObject(jsonStr, clazz));
    }

}
2
3
4
5
6
7
8
9
10
11
12
13
14
15
16
17
18
19
20
21
22
23
24
25
26
27
28
29
30
31
32
33
34
35
36
37
38
39
40
41
42
43
44
45
46
47
48
49
50
51
52
53
54
55
56
57
58
59
60
61
62
63
64
65
66
67
68
69
70
71
72
73
74
75
76
77
78
79
80
81
82
83
84
85
86
87
88
89
90
91
92
93
94
95
96
97
98
99
100
101
102
103
104
105
106
107
108
109
110
111
112
113
114
115
116
117
118
119
120
121
122
123
124
125
126
127
128
129
130
- 这些功能也都可以测试验证,也是平常用的较多的东西。
# 七、其他资料
← ConnectionPool Redis →

京公网安备 11030102010881号
| GPL Licensed | Copyright © 2019 小傅哥,All rights reserved.