# 面经手册 · 第22篇《线程池的介绍和使用,以及基于jvmti设计非入侵监控》
作者:小傅哥
博客:https://bugstack.cn (opens new window)
沉淀、分享、成长,让自己和他人都能有所收获!😄
# 一、前言
五常大米好吃!
哈哈哈,是不你总买五常大米,其实五常和榆树是挨着的,榆树大米也好吃,榆树还是天下第一粮仓呢!但是五常出名,所以只认识五常。
为什么提这个呢,因为阿里不允许使用 Executors 创建线程池!其他很多大厂也不允许,这么创建的话,控制不好会出现OOM。
好,本篇就带你学习四种线程池的不同使用方式、业务场景应用以及如何监控线程。
# 二、面试题
谢飞机,小记!,上次从面试官那逃跑后,恶补了多线程,自己好像也内卷了,所以出门逛逛!
面试官:嗨,飞机,飞机,这边!
谢飞机:嗯?!哎呀,面试官你咋来南海子公园了?
面试官:我家就附近,跑步来了。最近你咋样,上次问你的多线程学了吗?
谢飞机:哎,看了是看了,记不住鸭!
面试官:嗯,不常用确实记不住。不过你可以选择跳槽,来大厂,大厂的业务体量较大!
谢飞机:我就纠结呢,想回家考教师资格证了,我们村小学要教java了!
面试官:哈哈哈哈哈,一起!
# 三、四种线程池使用介绍
Executors 是创建线程池的工具类,比较典型常见的四种线程池包括:newFixedThreadPool、newSingleThreadExecutor、newCachedThreadPool、newScheduledThreadPool。每一种都有自己特定的典型例子,可以按照每种的特性用在不同的业务场景,也可以做为参照精细化创建线程池。
# 1. newFixedThreadPool
public static void main(String[] args) {
    ExecutorService executorService = Executors.newFixedThreadPool(3);
    for (int i = 1; i < 5; i++) {
        int groupId = i;
        executorService.execute(() -> {
            for (int j = 1; j < 5; j++) {
                try {
                    Thread.sleep(1000);
                } catch (InterruptedException ignored) {
                }
                logger.info("第 {} 组任务,第 {} 次执行完成", groupId, j);
            }
        });
    }
    executorService.shutdown();
}

// 测试结果
23:48:24.628 [pool-2-thread-1] INFO  o.i.i.test.Test_newFixedThreadPool - 第 1 组任务,第 1 次执行完成
23:48:24.628 [pool-2-thread-2] INFO  o.i.i.test.Test_newFixedThreadPool - 第 2 组任务,第 1 次执行完成
23:48:24.628 [pool-2-thread-3] INFO  o.i.i.test.Test_newFixedThreadPool - 第 3 组任务,第 1 次执行完成
23:48:25.633 [pool-2-thread-3] INFO  o.i.i.test.Test_newFixedThreadPool - 第 3 组任务,第 2 次执行完成
23:48:25.633 [pool-2-thread-1] INFO  o.i.i.test.Test_newFixedThreadPool - 第 1 组任务,第 2 次执行完成
23:48:25.633 [pool-2-thread-2] INFO  o.i.i.test.Test_newFixedThreadPool - 第 2 组任务,第 2 次执行完成
23:48:26.633 [pool-2-thread-3] INFO  o.i.i.test.Test_newFixedThreadPool - 第 3 组任务,第 3 次执行完成
23:48:26.633 [pool-2-thread-2] INFO  o.i.i.test.Test_newFixedThreadPool - 第 2 组任务,第 3 次执行完成
23:48:26.633 [pool-2-thread-1] INFO  o.i.i.test.Test_newFixedThreadPool - 第 1 组任务,第 3 次执行完成
23:48:27.634 [pool-2-thread-3] INFO  o.i.i.test.Test_newFixedThreadPool - 第 3 组任务,第 4 次执行完成
23:48:27.634 [pool-2-thread-2] INFO  o.i.i.test.Test_newFixedThreadPool - 第 2 组任务,第 4 次执行完成
23:48:27.634 [pool-2-thread-1] INFO  o.i.i.test.Test_newFixedThreadPool - 第 1 组任务,第 4 次执行完成
23:48:28.635 [pool-2-thread-3] INFO  o.i.i.test.Test_newFixedThreadPool - 第 4 组任务,第 1 次执行完成
23:48:29.635 [pool-2-thread-3] INFO  o.i.i.test.Test_newFixedThreadPool - 第 4 组任务,第 2 次执行完成
23:48:30.635 [pool-2-thread-3] INFO  o.i.i.test.Test_newFixedThreadPool - 第 4 组任务,第 3 次执行完成
23:48:31.636 [pool-2-thread-3] INFO  o.i.i.test.Test_newFixedThreadPool - 第 4 组任务,第 4 次执行完成

Process finished with exit code 0
2
3
4
5
6
7
8
9
10
11
12
13
14
15
16
17
18
19
20
21
22
23
24
25
26
27
28
29
30
31
32
33
34
35
36
图解

- 代码:
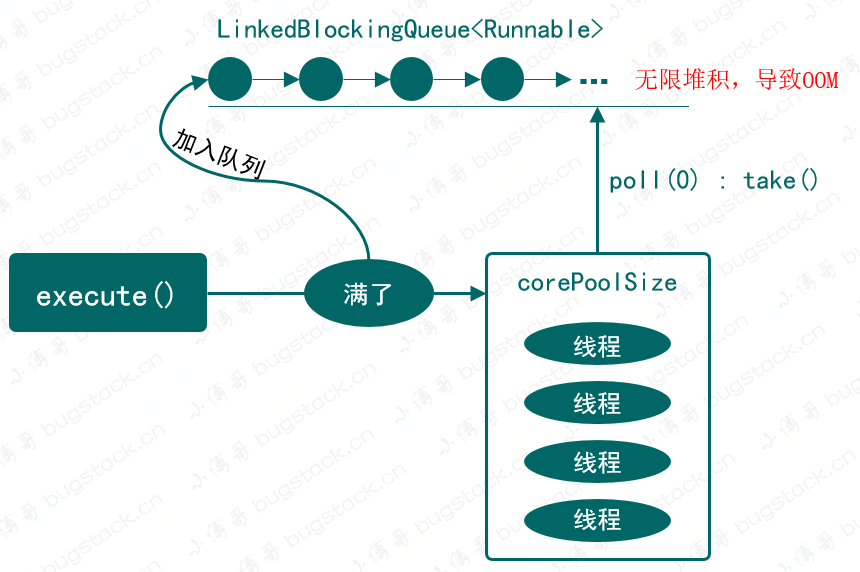
new ThreadPoolExecutor(nThreads, nThreads, 0L, TimeUnit.MILLISECONDS, new LinkedBlockingQueue<Runnable>()) - 介绍:创建一个固定大小可重复使用的线程池,以
LinkedBlockingQueue无界阻塞队列存放等待线程。 - 风险:随着线程任务不能被执行的的无限堆积,可能会导致OOM。
# 2. newSingleThreadExecutor
public static void main(String[] args) {
    ExecutorService executorService = Executors.newSingleThreadExecutor();
    for (int i = 1; i < 5; i++) {
        int groupId = i;
        executorService.execute(() -> {
            for (int j = 1; j < 5; j++) {
                try {
                    Thread.sleep(1000);
                } catch (InterruptedException ignored) {
                }
                logger.info("第 {} 组任务,第 {} 次执行完成", groupId, j);
            }
        });
    }
    executorService.shutdown();
}

// 测试结果
23:20:15.066 [pool-2-thread-1] INFO  o.i.i.t.Test_newSingleThreadExecutor - 第 1 组任务,第 1 次执行完成
23:20:16.069 [pool-2-thread-1] INFO  o.i.i.t.Test_newSingleThreadExecutor - 第 1 组任务,第 2 次执行完成
23:20:17.070 [pool-2-thread-1] INFO  o.i.i.t.Test_newSingleThreadExecutor - 第 1 组任务,第 3 次执行完成
23:20:18.070 [pool-2-thread-1] INFO  o.i.i.t.Test_newSingleThreadExecutor - 第 1 组任务,第 4 次执行完成
23:20:19.071 [pool-2-thread-1] INFO  o.i.i.t.Test_newSingleThreadExecutor - 第 2 组任务,第 1 次执行完成
23:23:280.071 [pool-2-thread-1] INFO  o.i.i.t.Test_newSingleThreadExecutor - 第 2 组任务,第 2 次执行完成
23:23:281.072 [pool-2-thread-1] INFO  o.i.i.t.Test_newSingleThreadExecutor - 第 2 组任务,第 3 次执行完成
23:23:282.072 [pool-2-thread-1] INFO  o.i.i.t.Test_newSingleThreadExecutor - 第 2 组任务,第 4 次执行完成
23:23:283.073 [pool-2-thread-1] INFO  o.i.i.t.Test_newSingleThreadExecutor - 第 3 组任务,第 1 次执行完成
23:23:284.074 [pool-2-thread-1] INFO  o.i.i.t.Test_newSingleThreadExecutor - 第 3 组任务,第 2 次执行完成
23:23:285.074 [pool-2-thread-1] INFO  o.i.i.t.Test_newSingleThreadExecutor - 第 3 组任务,第 3 次执行完成
23:23:286.075 [pool-2-thread-1] INFO  o.i.i.t.Test_newSingleThreadExecutor - 第 3 组任务,第 4 次执行完成
23:23:287.075 [pool-2-thread-1] INFO  o.i.i.t.Test_newSingleThreadExecutor - 第 4 组任务,第 1 次执行完成
23:23:288.075 [pool-2-thread-1] INFO  o.i.i.t.Test_newSingleThreadExecutor - 第 4 组任务,第 2 次执行完成
23:23:289.076 [pool-2-thread-1] INFO  o.i.i.t.Test_newSingleThreadExecutor - 第 4 组任务,第 3 次执行完成
23:20:30.076 [pool-2-thread-1] INFO  o.i.i.t.Test_newSingleThreadExecutor - 第 4 组任务,第 4 次执行完成
2
3
4
5
6
7
8
9
10
11
12
13
14
15
16
17
18
19
20
21
22
23
24
25
26
27
28
29
30
31
32
33
34
图解

- 代码:
new ThreadPoolExecutor(1, 1, 0L, TimeUnit.MILLISECONDS, new LinkedBlockingQueue<Runnable>()) - 介绍:只创建一个执行线程任务的线程池,如果出现意外终止则再创建一个。
- 风险:同样这也是一个无界队列存放待执行线程,无限堆积下会出现OOM。
# 3. newCachedThreadPool
public static void main(String[] args) throws InterruptedException {
    ExecutorService executorService = Executors.newCachedThreadPool();
    for (int i = 1; i < 5; i++) {
        int groupId = i;
        executorService.execute(() -> {
            for (int j = 1; j < 5; j++) {
                try {
                    Thread.sleep(1000);
                } catch (InterruptedException ignored) {
                }
                logger.info("第 {} 组任务,第 {} 次执行完成", groupId, j);
            }
        });
    }
    executorService.shutdown();

    // 测试结果
    23:25:59.818 [pool-2-thread-2] INFO  o.i.i.test.Test_newCachedThreadPool - 第 2 组任务,第 1 次执行完成
    23:25:59.818 [pool-2-thread-3] INFO  o.i.i.test.Test_newCachedThreadPool - 第 3 组任务,第 1 次执行完成
    23:25:59.818 [pool-2-thread-1] INFO  o.i.i.test.Test_newCachedThreadPool - 第 1 组任务,第 1 次执行完成
    23:25:59.818 [pool-2-thread-4] INFO  o.i.i.test.Test_newCachedThreadPool - 第 4 组任务,第 1 次执行完成
    23:25:00.823 [pool-2-thread-4] INFO  o.i.i.test.Test_newCachedThreadPool - 第 4 组任务,第 2 次执行完成
    23:25:00.823 [pool-2-thread-1] INFO  o.i.i.test.Test_newCachedThreadPool - 第 1 组任务,第 2 次执行完成
    23:25:00.823 [pool-2-thread-2] INFO  o.i.i.test.Test_newCachedThreadPool - 第 2 组任务,第 2 次执行完成
    23:25:00.823 [pool-2-thread-3] INFO  o.i.i.test.Test_newCachedThreadPool - 第 3 组任务,第 2 次执行完成
    23:25:01.823 [pool-2-thread-4] INFO  o.i.i.test.Test_newCachedThreadPool - 第 4 组任务,第 3 次执行完成
    23:25:01.823 [pool-2-thread-1] INFO  o.i.i.test.Test_newCachedThreadPool - 第 1 组任务,第 3 次执行完成
    23:25:01.824 [pool-2-thread-2] INFO  o.i.i.test.Test_newCachedThreadPool - 第 2 组任务,第 3 次执行完成
    23:25:01.824 [pool-2-thread-3] INFO  o.i.i.test.Test_newCachedThreadPool - 第 3 组任务,第 3 次执行完成
    23:25:02.824 [pool-2-thread-1] INFO  o.i.i.test.Test_newCachedThreadPool - 第 1 组任务,第 4 次执行完成
    23:25:02.824 [pool-2-thread-4] INFO  o.i.i.test.Test_newCachedThreadPool - 第 4 组任务,第 4 次执行完成
    23:25:02.825 [pool-2-thread-3] INFO  o.i.i.test.Test_newCachedThreadPool - 第 3 组任务,第 4 次执行完成
    23:25:02.825 [pool-2-thread-2] INFO  o.i.i.test.Test_newCachedThreadPool - 第 2 组任务,第 4 次执行完成
}
2
3
4
5
6
7
8
9
10
11
12
13
14
15
16
17
18
19
20
21
22
23
24
25
26
27
28
29
30
31
32
33
34
图解

- 代码:
new ThreadPoolExecutor(0, Integer.MAX_VALUE, 60L, TimeUnit.SECONDS, new SynchronousQueue<Runnable>()) - 介绍:首先
SynchronousQueue是一个生产消费模式的阻塞任务队列,只要有任务就需要有线程执行,线程池中的线程可以重复使用。 - 风险:如果线程任务比较耗时,又大量创建,会导致OOM
# 4. newScheduledThreadPool
public static void main(String[] args) {
    ScheduledExecutorService executorService = Executors.newScheduledThreadPool(1);
    executorService.schedule(() -> {
        logger.info("3秒后开始执行");
    }, 3, TimeUnit.SECONDS);
    executorService.scheduleAtFixedRate(() -> {
        logger.info("3秒后开始执行,以后每2秒执行一次");
    }, 3, 2, TimeUnit.SECONDS);
    executorService.scheduleWithFixedDelay(() -> {
        logger.info("3秒后开始执行,后续延迟2秒");
    }, 3, 2, TimeUnit.SECONDS);
}

// 测试结果
23:28:32.442 [pool-2-thread-1] INFO  o.i.i.t.Test_newScheduledThreadPool - 3秒后开始执行
23:28:32.444 [pool-2-thread-1] INFO  o.i.i.t.Test_newScheduledThreadPool - 3秒后开始执行,以后每2秒执行一次
23:28:32.444 [pool-2-thread-1] INFO  o.i.i.t.Test_newScheduledThreadPool - 3秒后开始执行,后续延迟2秒
23:28:34.441 [pool-2-thread-1] INFO  o.i.i.t.Test_newScheduledThreadPool - 3秒后开始执行,以后每2秒执行一次
23:28:34.445 [pool-2-thread-1] INFO  o.i.i.t.Test_newScheduledThreadPool - 3秒后开始执行,后续延迟2秒
23:28:36.440 [pool-2-thread-1] INFO  o.i.i.t.Test_newScheduledThreadPool - 3秒后开始执行,以后每2秒执行一次
23:28:36.445 [pool-2-thread-1] INFO  o.i.i.t.Test_newScheduledThreadPool - 3秒后开始执行,后续延迟2秒
2
3
4
5
6
7
8
9
10
11
12
13
14
15
16
17
18
19
20
21
图解

- 代码:
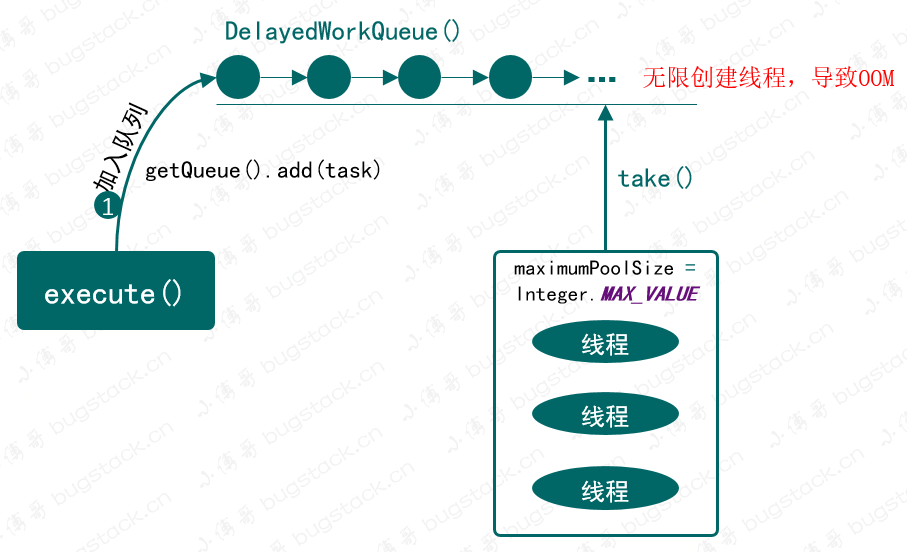
public ScheduledThreadPoolExecutor(int corePoolSize) { super(corePoolSize, Integer.MAX_VALUE, 0, NANOSECONDS, new ScheduledThreadPoolExecutor.DelayedWorkQueue()); } - 介绍:这就是一个比较有意思的线程池了,它可以延迟定时执行,有点像我们的定时任务。同样它也是一个无限大小的线程池
Integer.MAX_VALUE。它提供的调用方法比较多,包括:scheduleAtFixedRate、scheduleWithFixedDelay,可以按需选择延迟执行方式。 - 风险:同样由于这是一组无限容量的线程池,所以依旧有OOM风险。
# 四、线程池使用场景说明
什么时候使用线程池?
说简单是当为了给老板省钱的时候,因为使用线程池可以降低服务器资源的投入,让每台机器尽可能更大限度的使用CPU。
😄那你这么说肯定没办法升职加薪了!
所以如果说的高大上一点,那么是在符合科特尔法则 (opens new window)和阿姆达尔定律 (opens new window)的情况下,引入线程池的使用最为合理。啥意思呢,还得简单说!
假如:我们有一套电商服务,用户浏览商品的并发访问速率是:1000客户/每分钟,平均每个客户在服务器上的耗时0.5分钟。根据利特尔法则,在任何时刻,服务端都承担着1000*0.5=500个客户的业务处理量。过段时间大促了,并发访问的用户扩了一倍2000客户了,那怎么保障服务性能呢?
- 提高服务器并发处理的业务量,即提高到2000×0.5=1000
- 减少服务器平均处理客户请求的时间,即减少到:2000×0.25=500
所以:在有些场景下会把串行的请求接口,压缩成并行执行,如图 22-5

但是,线程池的使用会随着业务场景变化而不同,如果你的业务需要大量的使用线程池,并非常依赖线程池,那么就不可能用 Executors 工具类中提供的方法。因为这些线程池的创建都不够精细化,也非常容易造成OOM风险,而且随着业务场景逻辑不同,会有IO密集型和CPU密集型。
最终,大家使用的线程池都是使用 new ThreadPoolExecutor() 创建的,当然也有基于Spring的线程池配置 org.springframework.scheduling.concurrent.ThreadPoolTaskExecutor。
可你想过吗,同样一个接口在有活动时候怎么办、有大促时候怎么办,可能你当时设置的线程池是合理的,但是一到流量非常大的时候就很不适合了,所以如果能动态调整线程池就非常有必要了。而且使用 new ThreadPoolExecutor() 方式创建的线程池是可以通过提供的 set 方法进行动态调整的。有了这个动态调整的方法后,就可以把线程池包装起来,在配合动态调整的页面,动态更新线程池参数,就可以非常方便的调整线程池了。
# 五、获取线程池监控信息
你收过报警短信吗?
收过,半夜还有报警机器人打电话呢!崴,你的系统有个机器睡着了,快起来看看!!!
所以,如果你高频、高依赖线程池,那么有一个完整的监控系统,就非重要了。总不能线上挂了,你还不知道!
可监控内容
| 方法 | 含义 |
|---|---|
| getActiveCount() | 线程池中正在执行任务的线程数量 |
| getCompletedTaskCount() | 线程池已完成的任务数量,该值小于等于taskCount |
| getCorePoolSize() | 线程池的核心线程数量 |
| getLargestPoolSize() | 线程池曾经创建过的最大线程数量。通过这个数据可以知道线程池是否满过,也就是达到了maximumPoolSize |
| getMaximumPoolSize() | 线程池的最大线程数量 |
| getPoolSize() | 线程池当前的线程数量 |
| getTaskCount() | 线程池已经执行的和未执行的任务总数 |
# 1. 重写线程池方式监控
如果我们想监控一个线程池的方法执行动作,最简单的方式就是继承这个类,重写方法,在方法中添加动作收集信息。
伪代码
public class ThreadPoolMonitor extends ThreadPoolExecutor {

    @Override
    public void shutdown() {
        // 统计已执行任务、正在执行任务、未执行任务数量
        super.shutdown();
    }

    @Override
    public List<Runnable> shutdownNow() {
        // 统计已执行任务、正在执行任务、未执行任务数量
        return super.shutdownNow();
    }

    @Override
    protected void beforeExecute(Thread t, Runnable r) {
        // 记录开始时间
    }

    @Override
    protected void afterExecute(Runnable r, Throwable t) {
        // 记录完成耗时
    }

    ...
}
2
3
4
5
6
7
8
9
10
11
12
13
14
15
16
17
18
19
20
21
22
23
24
25
26
# 2. 基于JVMTI方式监控
这块是监控的重点,因为我们不太可能让每一个需要监控的线程池都来重写的方式记录,这样的改造成本太高了。
那么除了这个笨方法外,可以选择使用基于JVMTI的方式,进行开发监控组件。
JVMTI:JVMTI(JVM Tool Interface)位于jpda最底层,是Java虚拟机所提供的native编程接口。JVMTI可以提供性能分析、debug、内存管理、线程分析等功能。
基于jvmti提供的接口服务,运用C++代码(win32-add_library)在Agent_OnLoad里开发监控服务,并生成dll文件。开发完成后在java代码中加入agentpath,这样就可以监控到我们需要的信息内容。
环境准备:
- Dev-C++
- JetBrains CLion 2018.2.3
- IntelliJ IDEA Community Edition 2018.3.1 x64
- jdk1.8.0_45 64位
- jvmti(在jdk安装目录下jdk1.8.0_45\include里,把include整个文件夹复制到和工程案例同层级目录下,便于 include 引用)
配置信息:(路径相关修改为自己的)
- C++开发工具Clion配置
1.配置位置;Settings->Build,Execution,Deployment->Toolchains
- MinGM配置:D:\Program Files (x86)\Dev-Cpp\MinGW64
- java调试时配置
- 配置位置:Run/Debug Configurations ->VM options
- 配置内容:-agentpath:E:\itstack\git\github.com\itstack-jvmti\cmake-build-debug\libitstack_jvmti.dll
# 2.1 先做一个监控例子
Java工程
public class TestLocationException {

    public static void main(String[] args) {
        Logger logger = Logger.getLogger("TestLocationException");
        try {
            PartnerEggResourceImpl resource = new PartnerEggResourceImpl();
            Object obj = resource.queryUserInfoById(null);
            logger.info("测试结果:" + obj);
        } catch (Exception e) {
            //屏蔽异常
 }
    }
}

class PartnerEggResourceImpl {
    Logger logger = Logger.getLogger("PartnerEggResourceImpl");
    public Object queryUserInfoById(String userId) {
        logger.info("根据用户Id获取用户信息" + userId);
        if (null == userId) {
            throw new NullPointerException("根据用户Id获取用户信息,空指针异常");
        }
        return userId;
    }
}
2
3
4
5
6
7
8
9
10
11
12
13
14
15
16
17
18
19
20
21
22
23
24
c++监控
#include <iostream>
#include <cstring>
#include "jvmti.h"

using namespace std;

//异常回调函数
static void JNICALL
callbackException(jvmtiEnv *jvmti_env, JNIEnv *env, jthread thr, jmethodID methodId, jlocation location,
jobject exception, jmethodID catch_method, jlocation catch_location) {
// 获得方法对应的类
jclass clazz;
jvmti_env->GetMethodDeclaringClass(methodId, &clazz);

// 获得类的签名
char *class_signature;
jvmti_env->GetClassSignature(clazz, &class_signature, nullptr);

//过滤非本工程类信息
string::size_type idx;
string class_signature_str = class_signature;
idx = class_signature_str.find("org/itstack");
if (idx != 1) {
return;
}

//异常类名称
char *exception_class_name;
jclass exception_class = env->GetObjectClass(exception);
jvmti_env->GetClassSignature(exception_class, &exception_class_name, nullptr);

// 获得方法名称
char *method_name_ptr, *method_signature_ptr;
jvmti_env->GetMethodName(methodId, &method_name_ptr, &method_signature_ptr, nullptr);

//获取目标方法的起止地址和结束地址
jlocation start_location_ptr;    //方法的起始位置
jlocation end_location_ptr;      //用于方法的结束位置
jvmti_env->GetMethodLocation(methodId, &start_location_ptr, &end_location_ptr);

//输出测试结果
cout << "测试结果 - 定位类的签名:" << class_signature << endl;
cout << "测试结果 - 定位方法信息:" << method_name_ptr << " -> " << method_signature_ptr << endl;
cout << "测试结果 - 定位方法位置:" << start_location_ptr << " -> " << end_location_ptr + 1 << endl;
cout << "测试结果 - 异常类的名称:" << exception_class_name << endl;

cout << "测试结果-输出异常信息(可以分析行号):" << endl;
jclass throwable_class = (*env).FindClass("java/lang/Throwable");
jmethodID print_method = (*env).GetMethodID(throwable_class, "printStackTrace", "()V");
(*env).CallVoidMethod(exception, print_method);

}


JNIEXPORT jint JNICALL Agent_OnLoad(JavaVM *vm, char *options, void *reserved) {
    jvmtiEnv *gb_jvmti = nullptr;
    //初始化
    vm->GetEnv(reinterpret_cast<void **>(&gb_jvmti), JVMTI_VERSION_1_0);
    // 创建一个新的环境
    jvmtiCapabilities caps;
    memset(&caps, 0, sizeof(caps));
    caps.can_signal_thread = 1;
    caps.can_get_owned_monitor_info = 1;
    caps.can_generate_method_entry_events = 1;
    caps.can_generate_exception_events = 1;
    caps.can_generate_vm_object_alloc_events = 1;
    caps.can_tag_objects = 1;
    // 设置当前环境
    gb_jvmti->AddCapabilities(&caps);
    // 创建一个新的回调函数
    jvmtiEventCallbacks callbacks;
    memset(&callbacks, 0, sizeof(callbacks));
    //异常回调
    callbacks.Exception = &callbackException;
    // 设置回调函数
    gb_jvmti->SetEventCallbacks(&callbacks, sizeof(callbacks));
    // 开启事件监听(JVMTI_EVENT_EXCEPTION)
    gb_jvmti->SetEventNotificationMode(JVMTI_ENABLE, JVMTI_EVENT_EXCEPTION, nullptr);
    return JNI_OK;
}

JNIEXPORT void JNICALL Agent_OnUnload(JavaVM *vm) {
}
2
3
4
5
6
7
8
9
10
11
12
13
14
15
16
17
18
19
20
21
22
23
24
25
26
27
28
29
30
31
32
33
34
35
36
37
38
39
40
41
42
43
44
45
46
47
48
49
50
51
52
53
54
55
56
57
58
59
60
61
62
63
64
65
66
67
68
69
70
71
72
73
74
75
76
77
78
79
80
81
82
83
测试结果
在 VM vptions 中配置:-agentpath:E:\itstack\git\github.com\itstack-jvmti\cmake-build-debug\libitstack_jvmti.dll
十二月 16, 2020 23:53:27 下午 org.itstack.demo.PartnerEggResourceImpl queryUserInfoById
信息: 根据用户Id获取用户信息null
java.lang.NullPointerException: 根据用户Id获取用户信息,空指针异常
	at org.itstack.demo.PartnerEggResourceImpl.queryUserInfoById(TestLocationException.java:26)
	at org.itstack.demo.TestLocationException.main(TestLocationException.java:13)
测试结果-定位类的签名:Lorg/itstack/demo/PartnerEggResourceImpl;
测试结果-定位方法信息:queryUserInfoById -> (Ljava/lang/String;)Ljava/lang/Object;
测试结果-定位方法位置:0 -> 43
测试结果-异常类的名称:Ljava/lang/NullPointerException;
测试结果-输出异常信息(可以分析行号):
2
3
4
5
6
7
8
9
10
- 这就是基于JVMTI的方式进行监控,这样的方式可以做到非入侵代码。不需要硬编码,也就节省了人力,否则所有人都会进行开发监控内容,而这部分内容与业务逻辑并无关系。
# 2.2 扩展线程监控
其实方法差不多,都是基于C++开发DLL文件,引入使用。不过这部分代码会监控方法信息,并采集线程的执行内容。
static void JNICALL callbackMethodEntry(jvmtiEnv *jvmti_env, JNIEnv *env, jthread thr, jmethodID method) {
    // 获得方法对应的类
    jclass clazz;
    jvmti_env->GetMethodDeclaringClass(method, &clazz);

    // 获得类的签名
    char *class_signature;
    jvmti_env->GetClassSignature(clazz, &class_signature, nullptr);

    //过滤非本工程类信息
    string::size_type idx;
    string class_signature_str = class_signature;
    idx = class_signature_str.find("org/itstack");

    gb_jvmti->RawMonitorEnter(gb_lock);

    {
        //must be deallocate
        char *name = NULL, *sig = NULL, *gsig = NULL;
        jint thr_hash_code = 0;

        error = gb_jvmti->GetMethodName(method, &name, &sig, &gsig);
        error = gb_jvmti->GetObjectHashCode(thr, &thr_hash_code);

        if (strcmp(name, "start") == 0 || strcmp(name, "interrupt") == 0 ||
            strcmp(name, "join") == 0 || strcmp(name, "stop") == 0 ||
            strcmp(name, "suspend") == 0 || strcmp(name, "resume") == 0) {

            //must be deallocate
            jobject thd_ptr = NULL;
            jint hash_code = 0;
            gb_jvmti->GetLocalObject(thr, 0, 0, &thd_ptr);
            gb_jvmti->GetObjectHashCode(thd_ptr, &hash_code);

            printf("[线程监控]: thread (%10d) %10s (%10d)\n", thr_hash_code, name, hash_code);
        }
    }

    gb_jvmti->RawMonitorExit(gb_lock);
}

JNIEXPORT jint JNICALL Agent_OnLoad(JavaVM *jvm, char *options, void *reserved) {

    // 初始化
    jvm->GetEnv((void **) &gb_jvmti, JVMTI_VERSION_1_0);
    // 创建一个新的环境
    memset(&gb_capa, 0, sizeof(jvmtiCapabilities));
    gb_capa.can_signal_thread = 1;
    gb_capa.can_get_owned_monitor_info = 1;
    gb_capa.can_generate_method_exit_events = 1;
    gb_capa.can_generate_method_entry_events = 1;
    gb_capa.can_generate_exception_events = 1;
    gb_capa.can_generate_vm_object_alloc_events = 1;
    gb_capa.can_tag_objects = 1;
    gb_capa.can_generate_all_class_hook_events = 1;
    gb_capa.can_generate_native_method_bind_events = 1;
    gb_capa.can_access_local_variables = 1;
    gb_capa.can_get_monitor_info = 1;
    // 设置当前环境
    gb_jvmti->AddCapabilities(&gb_capa);
    // 创建一个新的回调函数
    jvmtiEventCallbacks callbacks;
    memset(&callbacks, 0, sizeof(jvmtiEventCallbacks));
    // 方法回调
    callbacks.MethodEntry = &callbackMethodEntry;
    // 设置回调函数
    gb_jvmti->SetEventCallbacks(&callbacks, sizeof(callbacks));

    gb_jvmti->CreateRawMonitor("XFG", &gb_lock);

    // 注册事件监听(JVMTI_EVENT_VM_INIT、JVMTI_EVENT_EXCEPTION、JVMTI_EVENT_NATIVE_METHOD_BIND、JVMTI_EVENT_CLASS_FILE_LOAD_HOOK、JVMTI_EVENT_METHOD_ENTRY、JVMTI_EVENT_METHOD_EXIT)
    error = gb_jvmti->SetEventNotificationMode(JVMTI_ENABLE, JVMTI_EVENT_VM_INIT, (jthread) NULL);
    error = gb_jvmti->SetEventNotificationMode(JVMTI_ENABLE, JVMTI_EVENT_EXCEPTION, (jthread) NULL);
    error = gb_jvmti->SetEventNotificationMode(JVMTI_ENABLE, JVMTI_EVENT_NATIVE_METHOD_BIND, (jthread) NULL);
    error = gb_jvmti->SetEventNotificationMode(JVMTI_ENABLE, JVMTI_EVENT_CLASS_FILE_LOAD_HOOK, (jthread) NULL);
    error = gb_jvmti->SetEventNotificationMode(JVMTI_ENABLE, JVMTI_EVENT_METHOD_ENTRY, (jthread) NULL);
    error = gb_jvmti->SetEventNotificationMode(JVMTI_ENABLE, JVMTI_EVENT_METHOD_EXIT, (jthread) NULL);

    return JNI_OK;
}
2
3
4
5
6
7
8
9
10
11
12
13
14
15
16
17
18
19
20
21
22
23
24
25
26
27
28
29
30
31
32
33
34
35
36
37
38
39
40
41
42
43
44
45
46
47
48
49
50
51
52
53
54
55
56
57
58
59
60
61
62
63
64
65
66
67
68
69
70
71
72
73
74
75
76
77
78
79
80
- 从监控的代码可以看到,这里有线程的 start、stop、join、interrupt 等,并可以记录执行信息。
- 另外这里监控的方法执行回调,
SetEventCallbacks(&callbacks, sizeof(callbacks));以及相应事件的添加。
# 六、总结
- 如果说你所经历的业务体量很小,那么几乎并不需要如此复杂的技术栈深度学习,甚至几乎不需要扩展各类功能,也不需要监控。但终究有一些需要造飞机的大厂,他们的业务体量庞大,并发数高,让原本可能就是一个简单的查询接口,也要做熔断、降级、限流、缓存、线程、异步、预热等等操作。
- 知其然才敢用,如果对一个技术点不是太熟悉,就不要胡乱使用,否则遇到的OOM并不是那么好复现,尤其是在并发场景下。当然如果你们技术体系中有各种服务,比如流量复现、链路追踪等等,那么还好。
- 又扯到了这,一个坚持学习、分享、沉淀的男人!好了,如果有错字、内容不准确,欢迎直接怼给我,我喜欢接受。但不要欺负我哦哈哈哈哈哈!

